Star Wars Jedi: Fallen Order - 14 Tips, Tricks & Secrets The Game Doesn't Tell You
Stormtroopers getting you down? We got you covered.

Seemingly out of nowhere, Star Wars Jedi: Fallen Order has dropped, and it's the exact game fans of the galaxy far far away have been waiting for. Despite spending years doing everything other than release a single-player title set in this universe, EA has finally relented, drafting in Respawn to bring their brand of kinetic, energetic action over to Disney's franchise.
Interestingly though, despite having all the hallmarks you'd expect from a Star Wars Jedi game, that being the force moves, the agile combat, and cutting the arms off everything (as long as they're not human, EA doesn't want to sacrifice that Teen rating after all), it's just as much inspired by the methodical approach to action and exploration taken by the likes of Dark Souls and the latest God of War, which admittedly takes some getting used to.
Fortunately, we've been tinkering with our sabers (not a euphemism) all weekend, and have drafted up a whole bunch of tips and tricks to help alleviate the pain of those early hours, and transform you from being an idiot padawan into a genuine Jedi Master.
14. Go To Dathomir ASAP

The cat is out the bag: there's a double-edged lightsaber in Fallen Order. Though it was kept out the marketing, it's pretty much an open secret right from the beginning of the game, as Cal's saber at the start has a destroyed bottom half, and you can fix it up as soon as you're given control of the Mantis.
Though the main plot requires you to go to Zeffo, it's best to go to Dathomir as soon as possible. You won't be able to make too much progress through the area until you're better equipped, but you will be able to find a workbench that let's Cal - rather unceremoniously may I add - complete his double-edged saber.
It's a great tool to have, and there's no reason not to track it down straight away.
13. Scan Enemies To Identify Weak Points

Your little pal BD-1 is more than just the most lovable companion since Death Stranding's Bridge Baby (yes I know it only came out a week before - 2019 has been great for cute sidekicks, what can I say), as he goes to work scanning pretty much anything significant in the environment, jumping off your back to seek out points of interest.
While most of what the droid finds is optional secret hunting, you do want to be actively scanning the enemies you slay. Each time you see a new type, make sure to tap down on the D-pad near the corpse and read the entry.
More often than not it will give you hints to use in future fights and even highlight weak points you can manipulate going forward.
12. Use The Double-Ended Lightsaber In Darker Areas

This sounds obvious, but I'm not going to pretend I didn't have a galaxy brain moment when I first discovered it: using a double-edged lightsaber to light up dark areas is way more effective than only using one.
I know, it's mad right?
Who'd have thought that having two beams of light coming out two different sides of the hilt would doubly brighten the area?
Well, not me, and realising this early on came in mighty handy when traversing the darker areas in the game, allowing me to make sure I didn't miss any hidden chests or secrets along the way.
11. Some Sub-Bosses Can't Be Fought Again

I'll keep this one snappy to avoid spoilers, but while most of the sub-bosses in the game can be fought as many times as you like until you finally get the better of them (so not to worry, you'll be able to come back stronger than ever and get your revenge on that fat rat in Bogano), there's a few that are one-time affairs.
At one point in the story a special new type of enemy is introduced, and it's these foes that can't be fought again should they slay you in combat. That kind of sucks if you're a completionist, but it does make them special.
I know a tip that says "don't die! isn't very helpful, but just know to make the most of these boss fights.
10. Keep Blocking After Deflecting Blaster Bolts

This is another relatively simply one, but an essential tactic to ensure you never get caught with your Jedi robes around your ankles nonetheless.
Nothing makes you feel more like a bona-fide Jedi Knight than nonchalantly deflecting a laser blast to kill the final Stormtrooper in an area, but nothing makes you feel more like a chump than missing the parry window and getting hit by one in the same situation.
Consequently, after you've successfully deflected the first blast, keep the block button held to send back any of the follow-up shots that you may not have accounted for. This is even more effective when using the double-edged saber, as you can take two enemies out at the same time.
9. Prioritise Force Abilities

At first, there isn't too much incentive to focus on Force abilities. Your meter runs out quickly, and the base ability to freeze enemies for a couple of seconds is fine, but not exactly a game changer.
However, fulfilling the potential of these early game abilities quickly is essential in having the most fun with Fallen Order's combat, and unlocking those awesome combos that made the trailers look so special.
In particular, make sure to upgrade the base versions of each power to the stronger ones that effect more than a single target. These are essential for crowd control and, even without that incentive, being able to force push a bunch of Stormtroopers off a ledge they stupidly backed themselves up against feels godly.
However, one thing to be aware of with the upgrades is..
8. Save Max Vitality And Force Upgrades For Last

It might be tempting to use early game skill points to focus on the essential buffs like more health and a bigger Force bar, and that initially makes sense. This is a game that is insanely difficult to get to grips with, and you'll probably be wanting to hedge your bets and improve your chances of surviving combat encounters as much as possible.
The thing is, there's not much that extra health or extra Force power is going to do to help, as it's the combat that needs to be honed and perfected. It might buy you maybe one extra hit, but it won't save you against the tougher foes.
Even without that in mind, you can actually upgrade these meters without using skill points. If you're exploring the worlds (which you should be), you'll come across secrets that permanently boost both traits anyway, leaving you with points early on to spend on better skills.
7. Seriously, Check Every Corner For Enemies

You'll notice very quickly that the enemies in Fallen Order are sneaky little s**ts. Though Dark Souls had a couple of enemies that would cheekily wait around corners and give you a bit of a jump, Respawn has filled their Star Wars game with loads of these, and they can get mighty annoying early on.
They're primarily an issue on Dathomir, as the humanoid foes will wait to ambush you seemingly around every single corner. Zeffo tackles this in a different way, including rodent enemies that can pop out the ground while you're distracted by someone else.
So, take it slow, and make sure to be wary of every single corner you come across to avoid a cheap, easy hit.
6. Don't Lock Onto Enemies When Using The Double-Edged Lightsaber
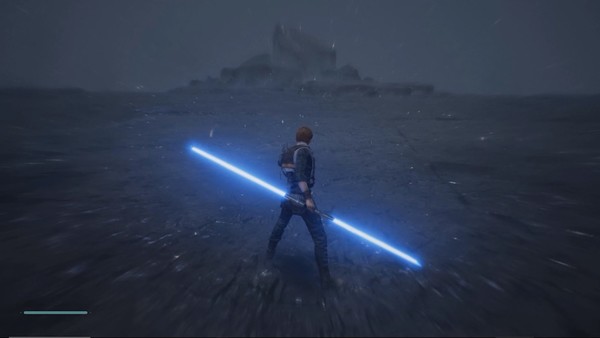
When you first pick up the double-edged lightsaber, the description says it's perfect for crowd control, but it doesn't really explain how to make the most of that function.
That's because locking onto an enemy (which is what the game tells you to do before then) sends you hurtling towards a single foe, and unless there's a bunch packed right together, you're not going to get much of a wide berth on your attacks.
Consequently, it's important to know when to lock onto an enemy and when to let the camera glide around freely. Locking on is ideal when you're fighting one or two enemies, but any more and you should be unlocking and moving from enemy to enemy between attacks.
The double-edged saber is effective generally, but smart use of lock-on really allows it to shine as a crowd control tool.
5. You Can Interrupt Unblockable Enemy Attacks

When the enemies in Fallen Order hit, they hit hard, especially the unblockable moves that require you to dodge out the way. These are handily signposted by the enemy flashing red just before they unleash the attack, but it still requires the player to understand which move is coming so they know when to dodge and not get caught.
However, you're not limited to simply jumping away and then counter-attacking. Instead, you can take the window just before the attack lands to interrupt it with your own onslaught and stop them in their tracks.
This doesn't always work on the heavier enemies that don't stun easily, but interrupting an unblockable move with either your own sneaky slash or a force power can give you that bit more breathing room in combat.
4. Interact With Every Lightsaber Workbench For Upgrades
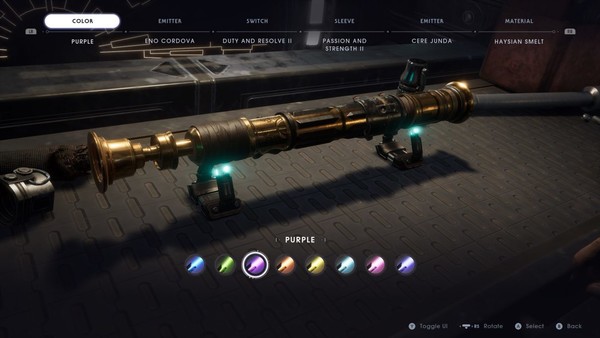
Another thing that's not explicitly made clear is what function workbenches have in the wild. You might just assume they're there to let you tinker with your lightsaber mid-mission, but more often than not if you find one of these out exploring, they'll have an upgrade that can unlock brand new abilities.
Usually these are for BD-1 and will allow you to open up previously inaccessible areas of the map, but they can also be combat-based, such as the ability to hack droids that are low on health and bring them on your side.
Again, it's never made a big deal of so it's quite easy to miss, but check in at every workbench you find and you won't be disappointed.
3. Mediate To Activate A Checkpoint
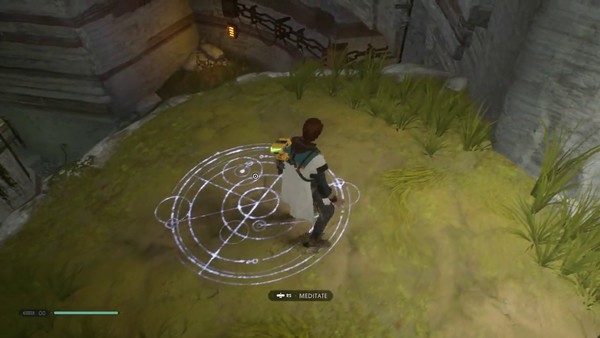
Another tip that seems obvious but is very easy to miss and can make your life hell, is that you should be meditating every chance you get as you progress, or even backtrack, through areas.
These sigils allow you to rest (which restores life and Force, but resets enemies) and upgrade your character, but it can be tempting to skip over them. Especially if you've cleared out a bunch of areas and are confident in your abilities, you might be tempted to push on, but it's never worth it.
That's because resting at these points creates a checkpoint. If you skip one and die, you'll be sent right back to the last one you rested at, which can result in the loss of a considerable chunk of progress (especially if you're zipping around exploring and not just following the main marker).
You might not think you need it, but it's better to have it banked and not need it, than be caught without a convenient checkpoint.
2. Check The Map In Every Room For Secret Areas

This is another simple trick, but one which can save you hours while exploring: every time you enter a new room (or clear it of enemies), check the in-game map.
Doing so will highlight every possible avenue to explore. Though the actual layout of the 3D map can be surprisingly confusing to get to grips with, secret areas and unexplored paths are clear as day, and are even handily colour coordinated.
Red pathways are something you shouldn't spend any time investigating, as it means you haven't unlocked the ability to head down that path yet. Green areas you should definitely check out though, and a quick glance at the map in each room will stop you having to haul ass back to these locations.
Sadly, hidden crates don't show up on the map, but the game can't give everything away, can it?
1. Don't Spend Too Much Time Exploring A Planet On First Visit

Even though I've just said you should be checking out green areas on your map, there are some places you can unlock early that you probably shouldn't venture to until you're explicitly told to later in the game.
Though there are some optional pathways on planets, most of the big ones you stumble upon will require you to return after reaching a certain point in the story. Consequently, while you can explore these areas, for the most part it's probably best to wait, as the bulk of progress will be cordoned off.
As a result, don't think you need to exhaust a planet of its different pathways and areas the first time you visit; there'll be plenty more opportunities to come back further down the line, and this way you won't get annoyed or mess with the pacing too much.